# /etc/apache2/sites-available/000-default.conf 내용 추가
<VirtualHost *:80>
ServerName example.com
ProxyRequests Off
ProxyPreserveHost On
ProxyVia Full
<Proxy *>
Require all granted
</Proxy>
<Location /nodejs>
ProxyPass http://localhost:3000
ProxyPassReverse http://localhost:3000
</Location>
<Directory "/var/www/example.com/html">
AllowOverride All
</Directory>
</VirtualHost>
3000포트로 허용함을 설정
$ sudo service apache2 restart
아파치 서버 재구동
# /var/www/html/nodejs/hello.js
var http = require('http');
http.createServer(function (request, response) {
response.writeHead(200, {'Content-Type': 'text/plain'});
response.end('Hello World! Node.js is working correctly.\n');
}).listen(3000);
console.log('Server running at http://127.0.0.1:3000/');
console.log('It is running now...');
마찬가지로 3000포트 연결 설정
hello.js 파일 실행
$ node /var/www/html/nodejs/hello.js
console.log 했던 내용 출력
http://example.com:8080/node.js/ 접속
접속완료
일단 서버 내에서 8080포트로 접속하여 3000포트의 Websocket communication 로그 출력이 완료되었다.
Vue.js 3 에서 Custom Directives를 사용하는 방법에 대해 포스팅 하겠다.
■ Custom Directive
1. v-model, v-show 디렉티브 같은 기본 디렉티브 이외에도 사용자가 직접 디렉티브를 정의해서 사용할 수 있다. 2. 전역에서 사용할 수 있다. 물론 각각의 컴포넌트에서도 가능하다. -> 사용하기에 따라 유용하겠죠?
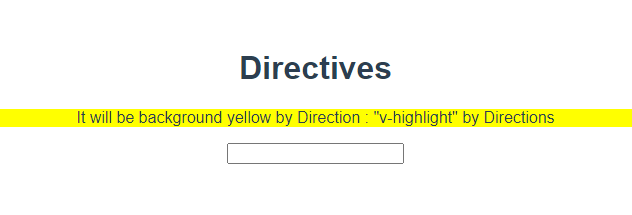
예시) 사용자가 컴포넌트에 접속했을 때, 입력필드로 자동 포커스 ( === autofocus) 되는 커스텀 디렉티브와 배경이 노란색의 컴포넌트
■ 전역 컴포넌트 사용하기
// Directives.js
// 1.배경색 노란색으로 설정
export const MyHighlightDirective = {
beforeMount(el){
el.style.background = 'yellow'
}
}
// 2. mounted 후에 focus로 해당 항목에 자동으로 focus. === html: autofocus
export const MyFocus = {
mounted(el) {
el.focus()
}
}
// main.js
import { MyHighlightDirective, MyFocus } from './directive/HighlightDirective'
// 보기 편하게 directive를 2개로 분리하였다. 배열로 해도 상관없을까?
createApp(App)
.directive('highlight', MyHighlightDirective)
.directive('focus', MyFocus)
.use(router).mount('#app')
main.js에 import 후, 아무 컴포넌트에서 해당 directive를 호출이 가능 -> 전역으로 등록하였기 때문에 별도의 선언·호출 없이 사용이 가능하다.
// Directives.vue
<template>
<div>
<h1>Directives</h1>
<p v-highlight>It will be background yellow by Direction : "v-highlight" by Directions</p>
<input v-focus type="text">
</div>
</template>
■ 컴포넌트 내부에서 선언하고 사용하기
- 오히려 전역으로 등록하는 것보다 간단하다.
// Directives.vue
<template>
<div>
<h1>Directives</h1>
<p v-highlight>It will be background yellow by Direction : "v-highlight" by Directions</p>
<input v-focus type="text"><br>
<p v-backgroundRed>It will be background red</p>
</div>
</template>
<script>
export default {
directives: {
backgroundRed: {
beforeMount(el) {
el.style.background = 'red'
el.style.color = 'white'
}
}
}
}
</script>
Node.js, JavaScript의 Websocket을 이용해 간단한 셀프 채팅 어플리케이션을 구현하겠습니다.
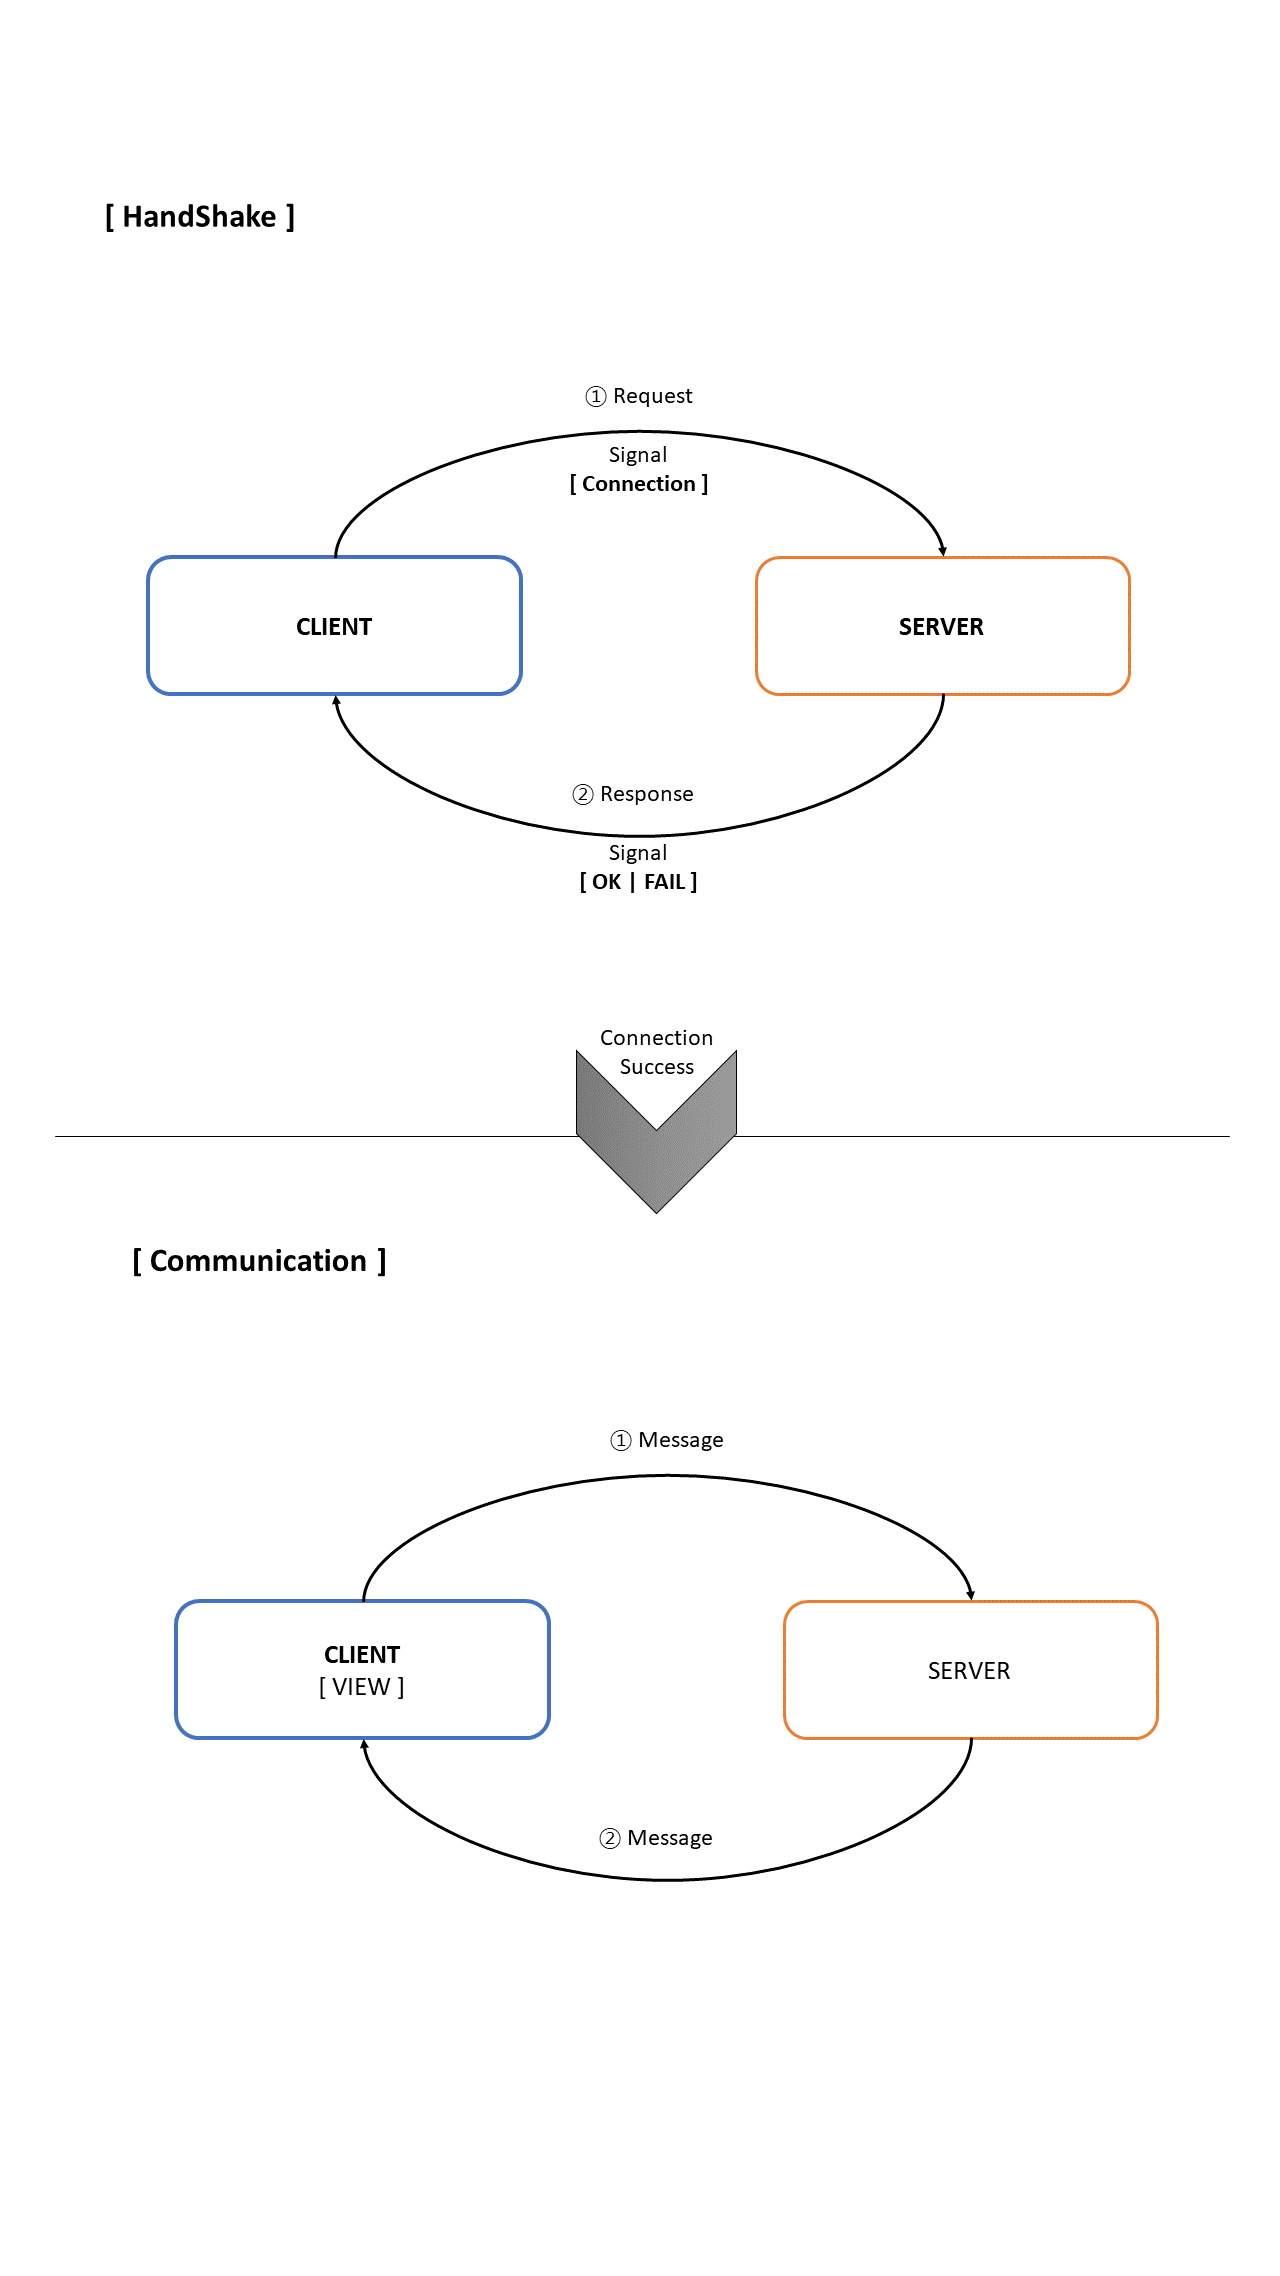
웹소켓의 기본적인 구성은 다음과 같습니다.
2단계로 구성한 웹소켓
굳이 개념치 않다면 안보셔도 무방합니다.
■ ws 설치
$ npm install ws
우선 npm 명령어로 ws (web socket) 을 설치하도록 하겠습니다.
■ Server.js
var WebSocketServer = require('ws').Server;
var wss = new WebSocketServer( { port: 8900 } ); // 포트번호는 자유롭게 작성해주세요.
wss.on( 'connection', function(ws){
console.log("connected");
// 클라이언트가 메시지를 전송했을 때 수신하여 다시 보내는 과정.
ws.on( 'message', function(msg){
console.log("msg[" + msg + "]" );
ws.send( msg );
});
});
포트번호(port)는 본인이 사용하는 포트번호를 지정하면 됩니다.
그리고 구동하는 방법은 터미널에서
$ node server.js
로 js파일을 구동시킵니다.
■ Client.html
html파일이던 php파일이던 상관없습니다. 중요한건 javascript로 한다는 것이니까요.
<!DOCTYPE html>
<html lang="en">
<head>
<meta charset="UTF-8">
<meta http-equiv="X-UA-Compatible" content="IE=edge">
<meta name="viewport" content="width=device-width, initial-scale=1.0">
<script src="http://code.jquery.com/jquery-1.11.0.min.js"></script>
<title>Document</title>
</head>
<body>
<form>
<input id="Send" type="text" autofocus> <!--메시지 작성 영역-->
<button type="button" onclick="sendMessage();" >Send</button> <!--전송버튼-->
</form>
<div id="Recv"></div> <!-- 보낸 메시지가 기록되는 곳 -->
<script>
$( document ).ready( function() {
var txtRecv = $('#Recv');
ws = new WebSocket("ws://localhost:8900");
// websocket 서버에 연결되면 연결 메시지를 화면에 출력한다.
ws.onopen = function(e){
txtRecv.append( "connected<br>" );
};
// websocket 에서 수신한 메시지를 화면에 출력한다.
ws.onmessage = function(e){
txtRecv.append( e.data + "<br>" );
};
// websocket 세션이 종료되면 화면에 출력한다.
ws.onclose = function(e){
txtRecv.append( "closed<br>" );
}
});
// 사용자가 입력한 메시지를 서버로 전송한다.
function sendMessage() {
var txtSend = $('#Send');
ws.send( txtSend.val() );
txtSend.val( "" );
txtSend.focus()
}
</script>
</body>
</html>
■ 결과
· 서버 구동 -> 연결 -> 페이지 접속마다 터미널에 "connected" 라는 로그가 찍힙니다.
· 메시지를 작성하고 버튼을 통해 전송하였을 때,
■ 결론
-> 몇가지 보완할 내용이 존재하긴 하다.
1. jQuery로 작성하였다는 점. -> 필자는 jQuery를 선호하지 않는다. 비동기통신 위주로 사용하는 스타일인데, 예전에는 ajax 사용할 때 사용했지만, 요즘은 axios 위주로 사용하기 때문에 이마저도 잘 사용하지 않는다.
2. 사소한 버그가 있다. -> 메시지를 작성하고 송출하였을 때, 해당 메시지가 웹페이지에 제대로 출력이 되지 않고, [ Object Object ] [ Blob ] 이런식으로 작성되더라. -> e.data를 통해 해당 내용을 append 시켜 작성하였는데, 아무래도 해당 node 자체가 입력이 된것이라 판단하다. -> 해결방법으로 <p> 를 하나 생성해서 해당 내용을 생성하여 삽입할 수 있다.